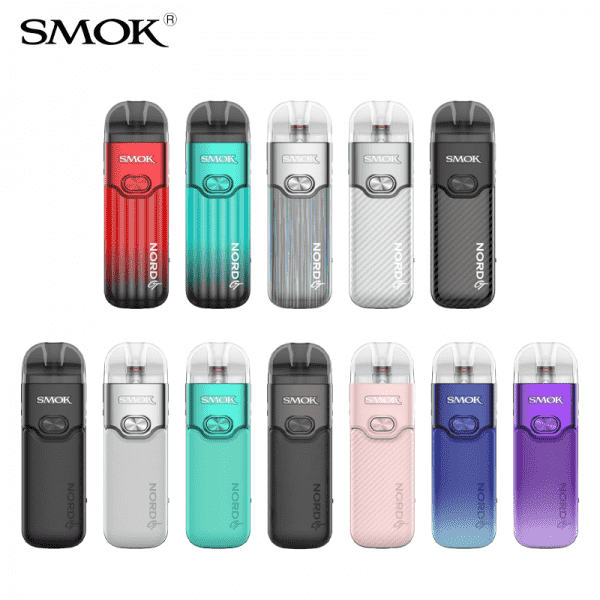
SMOK NORD GT 80W STARTER POD KIT
The SMOK NORD GT Kit has a 2500mAh rechargeable battery, enabling seamless charging via its USB-C port. Vapers can customize their experience with a maximum output of 80W, making it more tailored to their preferences. The kit also features a large 5ml pod capacity, perfect for prolonged vaping sessions, and an adjustable airflow feature that allows users to customize their experience even more. The SMOK NORD GT kit is also compatible with RPM 3 Coils, making it more versatile and expanding its compatibility range.
SMOK Nord GT Pod Kit Features:
Dimensions: 105 x 33 x 24mm
Wattage Output: 5 – 80W
Voltage Output: 0.5 – 4.0V
Resistance Range: 0.15 – 2.5ohm
Battery Capacity: 2500mAh
Firing System: Button Activated
Chassis Construction: Zinc Alloy
Charging Port: Type-C
Pod Series: Nord GT Pods
Pod Capacity: 5.0ml
Filling System: Side Fill
Airflow System: Adjustable
Coil Series: RPM 3 Coils
Coil Installation: Press to Fit
Pod Connection: Magnetic
Pod Material: PCTG
Available Colors: Matte Black Leather, White Leather, Blue Gradient Leather, Cyan Leather, Black Gunmetal Leather, Purple Gradient Leather, Pale Pink Leather, Black Carbon Fiber, Silver Carbon Fiber, Silver Black, Red Black, Cyan Black
Stepless Airflow Control Switch
0.69 Inch Display Screen
0.15ohm RPM 3 Mesh Coil (40 – 80W)
0.23ohm RPM 3 Mesh Coil (20 – 45W)
Package Includes:
1 x Nord GT Device
1 x Nord GT Pod
1 x 0.15ohm RPM 3 Coil
1 x 0.23ohm RPM 3 Coil
1 x USB Type-C Cable
1 x User Manual


Reviews
There are no reviews yet.